Laser marking machine area parameter setting
The regional parameters of the laser marking machine are shown in Figure 10-20.
10-20 区域参数 |
Area size: The actual maximum marking range corresponding to the galvanometer.
Galvanometer 1 = x: indicates the galvanometer output signal 1 of the control card as the x-axis of the user coordinate system.
Galvanometer 2 = x: indicates the galvanometer output signal 2 of the control card as the x-axis of the user coordinate system.
Offset X: indicates the X-direction distance of the center of the galvanometer offset field mirror.
Offset Y: indicates the Y-direction distance of the center of the galvanometer offset field mirror.
Use calibration file: Refers to the correction file generated by the external calibration program (corfile.exe) to correct the galvanometer. See the "corfile.exe program instructions" for details.
Reverse: Indicates that the current galvanometer output is reversed
Indicates the barrel or pincushion distortion correction factor with a default factor of 1.0 (parameter range 0.875-1.125). If you are designing a graphic as shown in Figure 10-21., the processed graphic is shown in Figure 10-22 or 10-23. For the case of Figures 10-22, the X-axis deformation coefficient is increased; for the case of Figures 10-23, the X-axis deformation coefficient is decreased.
Figure 10-21 Design Graphics |
Figure 10-22 Actual machining graphics | Figure 10-23 Actual machining graphics |
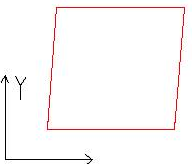
Indicates the parallelogram correction factor with a default factor of 1.0 (parameter range 0.875-1.125). If the graphic you are designing is shown in Figure 10-21., and the processed graphic is shown in Figure 10-24, you need to adjust this parameter to correct it.
Figure 10-24 Actual machining graphics |
Scale: Scale, the default is 100%. This parameter needs to be modified when the actual size marked and the software graphic size are different. When the actual size marked is smaller than the design size, increase the value of this parameter; when the actual size marked is larger than the design size, decrease the value of this parameter.
Note: If the laser marking machine galvanometer is deformed, you must first adjust the deformation before adjusting the expansion ratio.
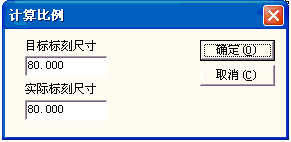
When setting the scale, you can directly press the laser marking machine area parameter setting. At this time, the dialog box shown in Figure 10-25 will pop up. We can input the size set in the software and the measured actual marking size. The scaling will be calculated automatically.
Figure 10-25 Setting the scale
After processing, go to the specified position: set the galvanometer to the specified position after the current machining is completed.
Password: Set the “Parameter” password. You can enter the “Parameter” setting dialog box only after entering the password.


